Author

Paul Watson

Browsing

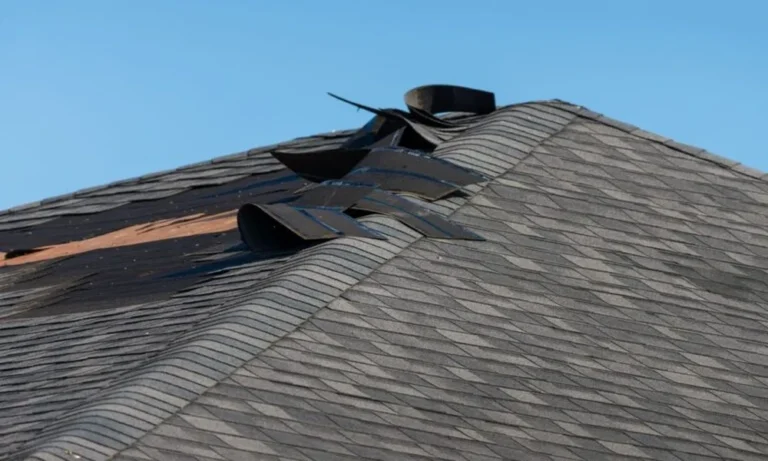
Three weeks after a hailstorm rolled through your neighborhood, your ceiling shows a faint brown ring. By then, the leak has been dripping into your attic insulation for days. You didn’t see it, because you never went up there.

That’s the thing about roof damage. It rarely announces itself. Shingles bruise, flashing pulls loose, and granules wash into your gutters while everything looks fine from the driveway. The damage keeps working quietly until it shows up as a stain, a soft spot, or a repair bill five times bigger than it needed to be.

This guide walks you through where to look, what to photograph, and when to stop poking around and call someone who climbs roofs for a living.

Why Hail and Wind Damage Hide So Well

Asphalt shingles are designed to look tough. They have a granular surface that protects the asphalt underneath from ultraviolet light, and when hail hits, it knocks granules loose and bruises the mat below. The shingle stays in place. It still looks like a shingle. But its ability to shed water is compromised, and the next hard rain finds the weak spot.

Wind works differently. Gusts don’t always rip shingles off. Often they lift the edge of a shingle just enough to break the sealant strip that holds it flat. Once that seal is broken, wind-driven rain slips underneath and travels sideways, sometimes several feet from where the damage actually happened.

If you’ve ever wondered why a leak shows up in a hallway closet with no roof above it, that’s usually the answer. Water enters uphill and travels along the decking before it finds a way through.

The National Weather Service tracks severe storm reports across the country, and areas like the Midwest see a steady stream of hail and straight-line wind events every spring and summer. You can check weather.gov for local storm reports after a big system moves through, which helps you connect the dots between a dated storm and damage you find weeks later.

What to Look For From the Ground (Without a Ladder)

You don’t need to climb anything to gather useful information. Grab a pair of binoculars and walk your property after the weather clears. Start with these five checks:

  • Granule buildup at the base of downspouts. If you’re sweeping up piles of sand-like grit after a storm, shingles are shedding their protective layer.
  • Dented soft metals. Gutters, downspouts, vents, and the metal caps on your chimney take hits that shingles sometimes absorb. Dents there mean hail was large enough to bruise roofing.
  • Lifted or missing shingle tabs. Look at the ridge line and the edges near gables. Those areas catch wind first.
  • Dark spots or shiny patches on the roof surface, which can indicate bruised mat or exposed asphalt.
  • Debris punctures. A branch doesn’t have to be huge to break a shingle seal. Even small impacts matter if they land in the wrong place.

Write down what you find and the date you found it. Photos taken from the same angle over several days can show whether damage is spreading. I’d rather you over-document than under-document, because insurance adjusters work from evidence, not memory.

Why the Attic Is Your Best Diagnostic Tool

Here’s where most homeowners stop, and it’s the wrong place to stop. The underside of your roof deck tells the real story.

Go up with a flashlight during daylight hours. Look for:

  • Water stains on rafters or the underside of decking
  • Daylight coming through the roof boards
  • Damp or compressed insulation
  • Rust on nails sticking through the deck
  • Musty smells that weren’t there before the storm
  • Nail rust is the one people overlook. It means moisture has been sitting in the wood long enough to oxidize metal, which usually points to a slow, ongoing leak rather than one storm event.

If your attic isn’t accessible or you find active moisture, don’t keep digging. Water plus insulation plus warm attic air is a recipe for bigger problems, and the sooner someone trained gets eyes on it, the cheaper the fix tends to be.

The Three-Pass Roof Check I Actually Use

Over the years I’ve settled on a simple sequence for evaluating storm damage. I call it the Three-Pass Check, and it keeps me from missing things in a rush.

Pass one: the perimeter. Walk the full exterior at ground level, checking gutters, downspouts, siding, and anything attached to the roof. This tells you the storm’s direction and intensity.

Pass two: the interior. Head into the attic and any upper-floor rooms with ceilings under roof planes. Note stains, moisture, and anything that smells wrong.

Pass three: the surface. This one requires either a safe roof access point or a professional inspection. Trained eyes look for bruising, seal breaks, flashing damage around chimneys and vents, and problems at valleys and penetrations.

The first two passes you can do yourself. The third one is where experience pays off, because damage that looks like nothing from six feet away often looks obvious from six inches.

What to Do Before You Call Anyone

Timing matters more than people realize. Most homeowner insurance policies have time limits for filing storm claims, and requirements around documenting damage. Check your policy documents before you assume you’re covered or that you’re not.

Here’s a practical checklist:

  1. Photograph everything you found, wide shots and close-ups.
  2. Note the date of the storm and the date you found damage.
  3. Save any receipts for emergency measures like tarps or temporary patching.
  4. Don’t throw away damaged materials if you can avoid it, since adjusters may want to see them.
  5. Get an inspection before you call your insurer, so you know what you’re dealing with.

The U.S. Census Bureau publishes housing data that shows how much of the country’s housing stock is older than a couple of decades, which matters here because aging roofs take storm damage harder than new ones. If your roof is past the halfway point of its expected life, an inspection after a major storm isn’t optional in my book. It’s how you avoid getting caught off guard. You can browse the agency’s housing statistics at census.gov if you want context on regional housing age.

When to Stop DIY and Call a Pro

There’s a clear line between inspecting and repairing. You can inspect safely from the ground and from inside the attic. You should not be walking a pitched roof after a storm, especially if shingles are compromised and you don’t know which ones will hold your weight.

Beyond safety, there’s the insurance side. Most adjusters want a professional assessment because it carries more weight than a homeowner’s photos alone. And if repairs are needed, the work has to be done to code or the next claim gets complicated.

For homeowners dealing with storm damage roof repair in St. Louis, working with a local contractor who understands regional weather patterns makes a real difference. St. Louis sits in a corridor that sees everything from hail to derechos to ice storms, and a roofer who knows that mix reads damage differently than someone who’s never worked in the area. storm damage roof repair in St. Louis teams can walk through the property, document findings, and provide a written report you can hand to your insurer.

That report matters more than most people think. It’s the difference between an adjuster saying “we’ll cover what we can see” and having itemized evidence of what actually happened.

One More Thing About Timing

Roof damage doesn’t always turn into an emergency in the first week. Sometimes it takes a season. Ice expands in the winter. Heat bakes the exposed asphalt through the summer. Each cycle widens the crack a little more.

That slow burn is why the answer to “when should I check my roof after a storm” is almost always “sooner than you think.” Not because every dent means disaster, but because small problems are cheap to fix and big ones are not. A few minutes with binoculars and a flashlight could save you thousands of dollars and a lot of stress.

So here’s your assignment: next time the sky clears after a serious storm, grab a notepad and walk the property. If something feels off, get it looked at. Your future self, the one not dealing with a sagging ceiling and a mold problem, will thank you for it.
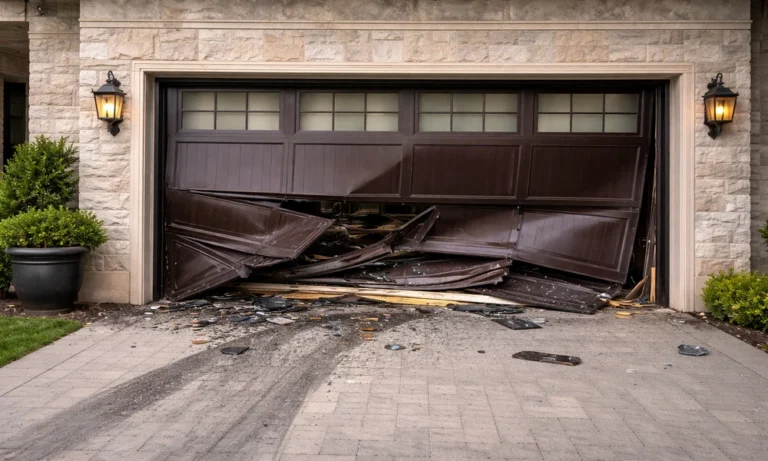

Two things happen when a garage door fails after dark. Your car is stuck on the wrong side of a wall, and every yank on the manual release makes you more convinced you’re about to break something expensive. Four out of five after-hours calls I’ve read about trace back to one of five parts, and the part that broke tells you exactly what to do next.

My stance, up front: the only after-hours failure worth touching yourself is a dead opener. Everything else, particularly anything involving a snapped spring, stays closed until a pro gets there. Call emergency garage door repair in Atlanta for a trapped car or hanging door and let someone with the right tools take the risk.

Here’s the useful part: the failure itself is a diagnostic. Where the door stopped, what noise it made, what the light on the opener did. Read those three clues correctly and you’ll know whether you’re looking at a 20-minute fix or a 2 AM service call.

Five failures cause almost every after-hours call

Garage doors are simple machines until one link quits, and the link that quits narrows the diagnosis fast.

  • Broken torsion spring. Usually announced by a bang like a shotgun going off in the garage. The door may rise a foot and stop dead, or not move at all.
  • Opener motor or logic board failure. The door hums, the light blinks, nothing travels. Often the quietest failure of the bunch.
  • Snapped cable. The door sags on one side and hangs crooked in the opening. Frayed strands near the drum are the tell.
  • Bent or jumped track. The door scrapes, jerks, or wedges partway down. Common after a car bumper kisses the rail.
  • Dead safety sensor or blocked photo eye. The door travels down, reverses, travels down again. This one looks dramatic and costs almost nothing to fix.

Springs and cables carry lethal tension. The Occupational Safety and Health Administration treats stored mechanical energy as a serious workplace hazard for good reason, and a torsion spring under load is exactly that, sitting in your garage. Don’t put a wrench on it. Don’t cut a cable. I know the videos make it look easy. Those videos are edited.

Is your stuck door actually an emergency?

Split every failure into three buckets before you spend a dime.

  • Urgent: a car trapped inside, a door hanging open to the street, or a door stuck halfway down with kids or pets home. You need a technician tonight, and you need one who answers at midnight.
  • Annoying: the door closes manually and latches, but the opener is toast. Fine until morning, so call at 7 AM and pay daytime rates.
  • Cosmetic: a dented panel, a noisy roller, a sensor light that flickers. This books a weekday appointment, not a midnight one.

Most homeowners overestimate what counts as urgent. If your car sits outside and the door is fully shut, you don’t have an emergency. You have an inconvenience with a morning solution, and I’d take that trade every single time over a premium service charge.

Six steps after the door quits

  1. Stop pressing the remote. Repeated cycles grind a jammed door against its track and turn a cheap fix into an expensive one.
  2. Check the wall outlet. Someone unplugged the opener to run a shop vac, and nobody fessed up. Unplug it for 30 seconds, plug it back in, try once.
  3. Clear the photo eyes. Two small lenses near the floor, one on each side. Wipe them with your shirt and sweep away anything within a foot.
  4. Look at the springs. A clean two-inch gap in the coil means it’s broken. That’s your diagnosis, and it’s also where your hands come off the project.
  5. Pull the red release handle only if the door is fully closed. Pulling it with the door up drops the door fast and loud. The National Fire Protection Association counts the garage among the more common spots for home fires to start, so a door left hanging open all night isn’t a risk worth carrying.
  6. Photograph everything. Spring gap, track bend, error code on the opener. Send pictures with your call and the tech arrives with the right spring on the truck.

Step four is where a lot of do-it-yourself attempts go sideways. A torsion spring stores enough energy to break a wrist, and the Internet is full of confident advice from people who got lucky. You don’t need luck. You need a person with a winding bar and a torque chart.

Three questions that separate a real emergency line from an answering service

Not every “24/7” number rings a human at midnight. Ask these before you commit.

Ask Good answer Walk away
Who answers this line at 11 PM? A dispatcher who can quote an arrival window A voicemail box or a promise to call back
Is there an after-hours fee? A flat trip charge stated up front Vague answers about “varies by job”
Can you text a photo of the tech and truck? Yes, before arrival No, or a refusal to name the technician

Here’s my rule: if the person on the phone can’t tell you what the visit costs before the truck rolls, the price is being written by whoever shows up. That’s not a service call, that’s a hostage negotiation.

How to stop the next 11 PM call

Annual maintenance catches most of these failures while they’re still cheap. Lubricate rollers and hinges with a garage door spray, not cooking oil, twice a year. Test the auto-reverse by laying a 2×4 flat in the door’s path and watching what happens. Tighten the bolts on the track brackets every fall, because vibration loosens everything eventually.

Springs are rated in cycles, not years, and a standard spring has a shelf life measured in thousands of open and close events. Two cars leaving twice a day burns through that tally faster than one retired couple’s car. If you’ve heard a creak on the way up for a month, that’s your warning shot.

Program the opener for the driver who comes home last so the door isn’t cycling multiple times each evening. And if you’re searching for “emergency garage door repair” at midnight, the Department of Energy notes that the garage is one of the biggest energy and air leaks in a typical house, which is one more reason a door that won’t seal properly deserves attention sooner than later. A gap you can see daylight through in June gets cold in January.

The short version: springs, cables, and tracks are hands-off, sensors and openers are usually fixable without help, and your car being trapped is the only thing on this list that truly can’t wait. Match your response to the failure, not to your panic.

So which failure is sitting in your garage right now, and does it actually deserve a midnight call or just a cup of coffee and a morning appointment?

You can spot dental work that feels “done” from across the room. Teeth that are too white, too flat, too even, too big for the face. That is usually what people are trying to avoid when they start looking into cosmetic treatment or searching for an urgent dental appointment Bloomfield NJ. You want your smile to look better, not borrowed. You want people to notice that you look healthy and rested, not ask what you had done.

That is the heart of What Natural Looking Means In Modern Cosmetic Dentistry. A natural smile is not perfect in the artificial sense. It fits your face, your age, your skin tone, your bite, and the way you speak. Modern cosmetic dentistry has moved away from the old one size fits all look, and a skilled family and cosmetic dentist aims for balance, not glare.

Natural cosmetic dentistry is built around harmony, not sameness

The best cosmetic results do not start with a shade chart. They start with proportion. Tooth length, width, edge shape, gum line, and translucency all affect whether a smile looks real. Natural teeth are not solid blocks of white. They reflect light in layers. They have slight variation. They fit the lips and the face when you smile and when your mouth is at rest.

This is why modern smile design often looks more subtle than people expect. If one front tooth is restored, the dentist has to match neighboring teeth in color and texture. If several teeth are being improved, the goal is still to avoid a copied, uniform look. You do not want six identical front teeth that erase your features. You want a smile that looks like you on your best day.

Materials play a big part in that result. Newer ceramics and bonding materials can mimic the way enamel reflects light far better than older options. Research into dental materials and restorative advances has helped improve strength, shade matching, and lifelike appearance. That matters because natural looking dental work has to do two jobs at once. It has to blend in, and it has to hold up.

Unnatural results usually come from rushed choices and poor planning

Most people do not ask for an obviously fake smile. It happens when treatment is chosen too quickly or for the wrong reason. Whitening without checking existing crowns or fillings can create mismatched shades. Veneers placed on healthy teeth without careful design can make the smile bulky. Closing every tiny gap or rounding every edge can remove the character that made the smile feel real in the first place.

You may already be thinking about that tension. You want straighter, brighter, more even teeth, but you do not want to lose your face in the process. That concern is valid. Cosmetic dentistry is part health care and part design. If either side is ignored, the result can feel off every time you see yourself in a photo.

Veneers are a good example. They can be beautiful and conservative when properly planned, but they are not a style accessory to pick from a catalog. The shape, thickness, and color have to be chosen with care. The University of Rochester Medical Center explains in its guide on whether veneers are right for you that the decision depends on your goals, oral health, and the condition of the teeth underneath. That is why a cosmetic consultation should include more than “pick the whitest shade.”

Natural looking cosmetic dentistry often means doing less, but doing it better

Sometimes the most natural result comes from combining small treatments instead of jumping to a full makeover. Whitening, minor bonding, enamel shaping, and orthodontic alignment can make a dramatic change without making your teeth look manufactured. If one tooth is chipped and another is slightly rotated, correcting those details may be enough. If the gums are uneven, reshaping the gum line may matter more than changing the teeth themselves.

This is where a cosmetic dentistry plan should feel personal. A college student with one broken front tooth does not need the same treatment as someone with worn enamel, old dental work, and bite problems. A parent who grinds at night may need bite protection before any cosmetic changes. A person with thin enamel may need a softer whitening approach. Natural results come from respecting what is already there.

Common cosmetic options and how natural they tend to look

Treatment Best Use Natural Look Potential Main Risk If Overdone
Professional whitening Stains and general dullness High when shade matches skin tone and age Teeth can look too bright or uneven next to old restorations
Bonding Small chips, gaps, shape fixes High for minor corrections Surface can stain or look bulky if poorly shaped
Veneers Color, shape, wear, moderate spacing issues Very high with careful design and quality materials Flat, opaque, oversized teeth
Clear aligners Crowding, spacing, bite alignment High because they preserve natural tooth structure Expecting alignment alone to fix color or wear
Crowns Heavily damaged or weak teeth High when medically needed and well matched Overuse on healthy teeth can create an artificial look

Natural smile aesthetics depend on your whole face

A natural smile does not exist in isolation. Lip movement, facial symmetry, gum display, speech, and even personality shape the final result. Some people suit softer rounded edges. Others look better with slightly more defined tooth anatomy. Younger smiles often show more edge detail and length. Older smiles may need restoration that brings back what wear has taken away without trying to recreate a teenage smile on an adult face.

That is why photos, mockups, and careful discussion matter. If you have ever seen someone’s new smile and thought, “their teeth are nice, but something looks strange,” the issue was often proportion, not quality. Good cosmetic treatment should blend so well that the work disappears.

Three steps to get a more natural smile result

1. Ask for a conservative treatment plan. Tell the dentist you want the least invasive option that meets your goals. That opens the door to whitening, bonding, or alignment before more aggressive treatment is discussed.

2. Review shape, not just shade. Bring photos of your smile from earlier years if you liked how it looked then. Ask to discuss tooth length, edge shape, and gum line. The most natural result usually comes from shape decisions, not the whitest color available.

3. Make sure function is part of the plan. If you clench, grind, have old fillings, or notice uneven wear, deal with that first. Cosmetic work that ignores bite problems is more likely to chip, feel uncomfortable, or start looking unnatural over time.

Modern cosmetic dental care can look remarkably real when it is planned with restraint and precision. You do not need a “perfect” smile to look better. You need one that fits you, works well, and does not draw attention for the wrong reasons. If you are considering treatment, schedule a consultation with a family and cosmetic dentist and ask for a plan that protects your tooth structure while aiming for a natural result.

Securing the right farmland financing calls for careful planning and meeting lender standards. Most loan options, including large agricultural land mortgage financing, require you to demonstrate financial stability and clear transaction intent from day one.

Lenders review your financial background in detail before approving any farm purchase loans at or above $400,000. They assess whether your financial history and available collateral meet the risk guidelines used by private lenders serving agricultural real estate borrowers.

Lenders assess repayment ability using documentation that covers income trends, assets, liabilities, and land equity. The required down payment matters as well because equity helps determine how the transaction can be structured for each borrower profile.

Knowing the relevant credit and financial benchmarks helps you determine whether you’re ready to apply or need more time to qualify under lending requirements tied directly to farm real estate mortgages and agricultural land loans.

Understanding credit expectations is the first step when preparing for this type of long-term transaction.

Understanding Credit Score and Financial History Requirements

Credit score checks play a key part in agricultural land mortgage financing. Lenders look for a financial history that shows you can meet your obligations over time. Credit requirements vary by lender and transaction, with the overall financial review also considering assets, liabilities, land value, and available equity.

Your payment track record, length of credit use, and the mix of past debts all factor into your credit profile and final review. A strong repayment history can support your standing, but exceptions may apply after a full financial review.

Some private lenders review applications individually, especially when you have substantial land equity or a clear transaction objective. Reviewing these financial factors first will prepare you for the next steps in agricultural land mortgage financing.

Down Payment Expectations for Farmland Loans

Down payment requirements shape the structure of farmland purchase loans and determine your upfront cash requirement for farmland. The exact percentage varies by lender, land type, transaction structure, and your available equity.

  1. Size of Down Payment: Down payment requirements vary by transaction and lender. The amount depends on factors such as your financial profile, the land’s value, available collateral, and the overall structure of the transaction.
  2. Source of Funds: The cash for your down payment must come from your personal funds or documented assets. Lenders look for a clear paper trail, such as bank statements or records of asset sales. The source and documentation requirements can vary for larger agricultural real estate transactions.
  3. Collateral Contribution: Many lenders may consider land you already own when structuring a new purchase. This can allow you to use built-up equity rather than relying on cash alone. This approach can be relevant when expanding farmland holdings through land-backed mortgage financing.

Income Verification and Farm Business Planning Essentials

Lenders want documentation showing your financial capacity and a clear transaction plan before they fund large-scale farmland purchase loans.

  1. Income Documentation: Key records often include tax returns and bank records covering multiple years. Clear, verifiable income and financial records help lenders evaluate your capacity for private farmland financing.
  2. Profit and Loss Statements: Clear financial records help show revenue trends and liabilities associated with the property or transaction. Consistent financial information supports the review of large Farm Mortgage Loans.
  3. Current Balance Sheet: A current balance sheet showing your assets and liabilities must be accurate and up to date. Lenders consider net worth because it helps establish whether you can support major, long-term Agricultural Real Estate Loans.
  4. Transaction Plan: Your plan should explain the property being acquired, the intended ownership structure, the financing amount, and how the transaction will be supported over the loan term. Lenders look for clear objectives, projected cash flow, and a repayment structure appropriate for the size of the farmland loan.
  5. Financial History: Prior financial records demonstrate your ability to manage significant obligations and indicate long-term financial strength. This information supports the lender’s review of your ability to meet Land Mortgage Loans obligations over time.

Types of Farmland Purchase Loans Available

There are several main types of farmland purchase loans you can consider, each designed for specific land needs and financing goals. Farm Mortgage Loans provide financing starting at $400,000. Some options focus on Agricultural Real Estate Loans for landowners who want to acquire or refinance existing holdings.

For new land purchases, long-term Agricultural Land Loans are a common choice, allowing you to structure repayment around the transaction and property. Horse Farm Mortgage Loans target specialty properties, such as equestrian land, with financing structured around the characteristics and value of the property.

Buyout Loans let you, a partner, or a family member buy full control of inherited or shared agricultural property. Farm Refinance Loans replace current loans, providing a potential way to restructure existing land-backed debt.

There is also land-only financing through Land Mortgage Loans, allowing you to purchase raw acreage where the property itself serves as the primary collateral. These farmland financing solutions vary primarily by collateral, transaction structure, and repayment terms.

Comparing available options will help you match your land transaction to the appropriate loan structure.

Meeting the minimum requirements for farmland purchase loans shapes your approval prospects and available financing options. Lenders weigh your credit profile, financial strength, available collateral, and transaction structure when reviewing Agricultural Land Loans.

A history of on-time payments and clear transaction intent matter for land-backed financing. The required equity contribution varies according to the lender, property, borrower profile, and transaction structure.

Your existing land equity may count as part of your upfront investment when using Farm Mortgage Loans or similar products. Collateral strength and detailed financials work together to support your application throughout the review.

Agricultural Real Estate Loans and Land Mortgage Loans require a clear understanding of the property’s value and the borrower’s financial position. Accurate records and a realistic financial plan help clarify repayment prospects for Farm Refinance Loans or new land purchases.

Options like Buyout Loans and Horse Farm Mortgage Loans provide choices for buyers gaining control of shared property or acquiring specialty agricultural real estate. With each product, your long-term goals, available collateral, and land value shape the appropriate financing structure.

Farm Mortgage Capital provides established landowners with private farmland financing of $400,000 or more for acquisition, refinance, or equity restructuring needs.


Seasonal promotional structures follow calendar events, holiday periods, and recurring annual occasions that cryptocurrency gaming operations use to create time-limited offer formats above standard weekly and monthly promotional cycles. Crypto.games casino building seasonal campaigns applies distinct bonus structures, qualifying conditions, and prize formats that seasonal themes shape rather than standard promotional templates that apply without thematic differentiation. The frameworks for seasonal offers deliver across a year-round promotional calendar.

Winter campaigns concentrate value

Winter seasonal campaigns coinciding with major holiday periods concentrate promotional value above standard calendar offers through elevated deposit matching percentages, expanded free spin allocations, and tournament prize pools that holiday period player activity volumes justify funding above routine promotional budgets. Winter campaign structures frequently incorporate multi-stage promotional sequences running across several consecutive weeks rather than single-activation offers that standard weekly promotions deliver through one qualifying event. Advent-style sequential unlocking mechanics, releasing new promotional components across consecutive days, represent a winter-specific structural format that other seasonal periods rarely replicate through equivalent daily progression frameworks within single extended campaign sequences.

Spring offers a reset engagement

Spring seasonal campaigns structuring fresh-start promotional themes around renewed player engagement deliver reload bonus formats, loyalty point multiplier periods, and catalogue spotlight promotions, as winter campaign intensity gives way to lighter structural approaches. Spring campaign structures frequently incorporate loyalty acceleration mechanics applying elevated point accumulation rates across defined activity periods, rather than deposit-linked bonus credit formats that winter promotional periods concentrate around. Game spotlight promotions featuring specific catalogue titles through enhanced return periods, tournament formats, or exclusive seasonal variants represent spring structural approaches that catalogue freshness themes accommodate naturally through new release timing that studios coordinate around spring promotional calendars.

Summer tournaments dominate

Summer seasonal campaign structures concentrating around tournament formats deliver competitive prize pool distributions across leaderboard mechanics that extend summer periods, sustaining through longer campaign durations than shorter holiday window promotions accommodate. Summer tournament structures apply leaderboard point accumulation across defined game categories over multi-week periods, distributing prize pools across ranked positions rather than individual activation events determining all prize delivery independently of comparative performance across participating player populations. Satellite tournament structures feeding qualifying players toward final prize pool events represent summer-specific promotional formats that extended campaign windows enable through the multi-stage progression that shorter seasonal periods never adequately accommodate within their compressed promotional timeframes.

Autumn campaigns bridge seasons

Autumn seasonal campaign structures bridging summer conclusion toward winter campaign commencement apply transitional promotional formats that reactivation bonus sequences, loyalty tier reset opportunities, and early winter preview promotions each contribute to across autumn calendar periods. Reactivation sequences targeting players whose activity levels declined across summer periods deliver tailored return incentive structures that autumn timing suits through the natural activity increase that cooler period engagement patterns historically produce across player populations. Early winter preview promotions appearing within autumn campaign structures introduce forthcoming seasonal offer formats through preview access events that generate anticipation above standard promotional announcement communications that equivalent non-seasonal periods use without seasonal narrative context.

Seasonal offer structures across cryptocurrency gaming operations differ through sequencing that each period implements distinctly. Reviewing seasonal campaign terms as early as possible before participation windows open ensures qualifying activity aligns with specific eligibility requirements and that time-limited seasonal structures apply more strictly than standard recurring promotional formats.